
5 Halloween LEGO® STEM Challenges for Kids: Build, Test, and Create

Halloween is the perfect time to turn spooky ideas into hands-on building adventures! From designing a haunted house that survives a gentle shake to creating a rolling pumpkin vehicle, Halloween LEGO® activities for kids combine seasonal fun with science, technology, engineering, and math (STEM).
Instead of following instructions, kids become little engineers. They can test their ideas, solve problems, and discover how small changes improve their designs.
These five Halloween LEGO® STEM challenges bring creativity, problem-solving, and teamwork into your home, classroom, or after-school enrichment program. Grab your bricks and get ready to build!
What Can Kids Build with LEGO® for Halloween?
Kids can build haunted houses, bridges for Halloween characters, movable spiders, rolling pumpkin vehicles, and spooky story scenes. Each project encourages creativity while introducing engineering, problem-solving, and early STEM concepts.
The best part? There is no single right way to build. Kids can start with a simple idea, test what works, and improve their creations along the way.
Here are five Halloween LEGO® builds to try this spooky season!
1. Build a Haunted House That Can Withstand a Shake

The challenge: Can your child build a haunted house that stays standing when the ground moves?
Haunted houses are a Halloween favorite, but keeping one upright takes more than spooky decorations. Kids must think about balance, stability, and how to create a strong structure.
Suggested ages: 5–12 years
Estimated time: 20–30 minutes
Materials:
LEGO® bricks in different shapes and sizes
Flat LEGO® plates or a sturdy building base
Small LEGO® figures or Halloween decorations
A flat table or surface for testing
Step-by-step directions
Plan the haunted house. Ask your child to imagine its shape. Will it have a tall tower, a crooked roof, or a secret entrance?
Build a strong foundation. Start with a wide base and connect the bricks securely.
Add the walls and roof. Experiment with different brick arrangements to strengthen the structure.
Decorate the house. Add windows, doors, ghosts, bats, or other spooky details.
Test the design. Gently tap the table or move the building surface slightly.
Make improvements. If part of the house falls, try widening the base or reinforcing weak connections.
What will kids learn?
Engineering: How structures are designed and strengthened.
Physics: How balance and stability affect a building.
Problem-solving: How to identify weak points and improve a design.
Persistence: Why trying again is part of the building process.
Make it easier: Build a small, single-story haunted house using larger bricks and a wide base.
Make it more challenging: Add a tall tower, an overhanging roof, or a bridge between two sections. Compare how different designs respond to the same gentle shake.
Like many hands-on STEM activities, this challenge shows kids that their first design is only the beginning. Testing, adjusting, and trying again help them understand why some structures work better than others.
2. Design a Bridge for a Halloween Character
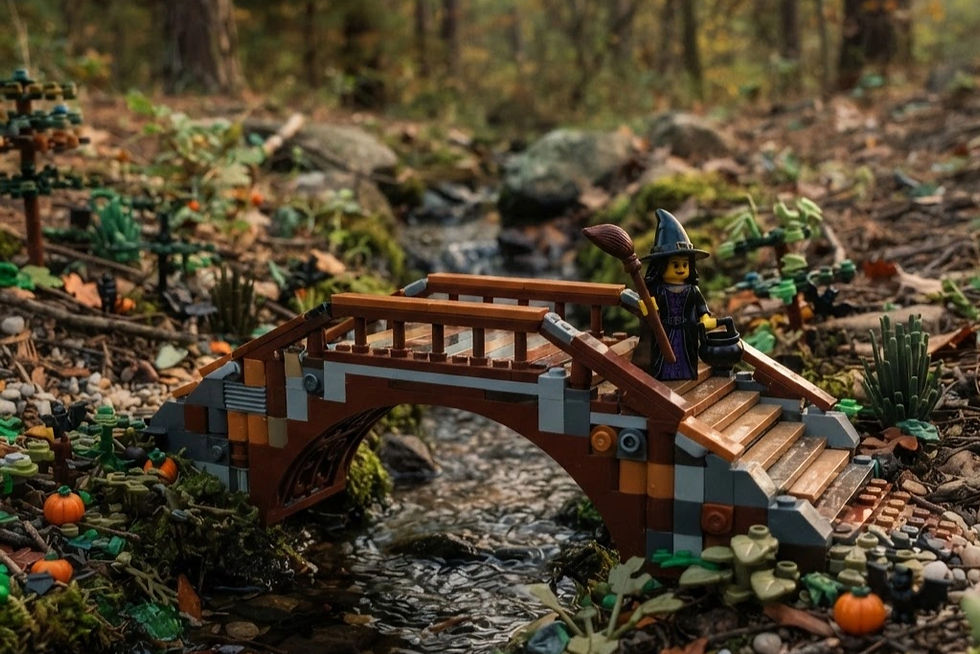
The challenge: Can your child build a bridge strong enough for a ghost, witch, or skeleton to cross?
Every Halloween character needs a way to get from one side to another! In this challenge, kids become engineers tasked with designing a bridge that spans a gap and supports a small figure.
Suggested ages: 6–12 years
Estimated time: 20–35 minutes
Materials:
LEGO® bricks and plates
Two sturdy supports, such as stacks of books
A small LEGO® minifigure or lightweight Halloween character
A ruler or measuring tape, if available
Step-by-step directions
Create the gap. Place two supports a short distance apart, leaving a space for the bridge.
Set the goal. Decide how far the bridge needs to reach and which character will cross it.
Build the first design. Use LEGO® bricks and plates to connect both sides.
Test the bridge. Carefully place the character in the middle. Does the bridge stay in place, sag, or collapse?
Improve the design. Add supports underneath, reinforce the sides, or change how the bricks connect.
Test again. Compare the first and second designs. Which changes made the biggest difference?
What will kids learn?
Structural engineering: How supports help a structure span a gap.
Critical thinking: How to identify design weaknesses.
Measurement: How to compare bridge lengths and gaps.
Testing and iteration: How to use results to improve a solution.
Make it easier: Shorten the gap and let children use a solid plate as the bridge deck.
Make it more challenging: Increase the gap or ask children to build a bridge that supports two or more lightweight figures. They can compare designs and explain which one performed better.
This challenge is also a great opportunity for teamwork. Kids can share ideas, test different solutions, and discover how combining their ideas can lead to a stronger bridge.
3. Create a LEGO® Spider with a Movable Mechanism

The challenge: Can your child build a spider that moves its legs or body using a simple mechanism?
Spiders are a classic Halloween symbol and a fun way to explore movement. Kids can experiment with hinged connections, rotating parts, and other moving LEGO® elements to create their own creepy-crawly creatures.
Suggested ages: 6–12 years
Estimated time: 25–40 minutes
Materials:
LEGO® bricks and plates
LEGO® hinge pieces, clips, or other compatible moving elements
Round plates or small bricks for the spider's eyes
A flat surface for testing movement
Step-by-step directions
Build the spider's body. Use a central group of bricks to create the head and body.
Add eight legs. Attach four legs on each side using compatible pieces. Start with simple, fixed legs if moving parts are unavailable.
Create a movable feature. Use hinges or suitable connections so the legs can change position, or build a rotating section into the body.
Test the movement. Gently move the legs or mechanism. Check whether the pieces stay attached and move as intended.
Make adjustments. Change the placement or length of the legs if the spider tips over or the mechanism gets stuck.
Give it personality. Add eyes, fangs, or a small web-inspired base.
What will kids learn?
Mechanics: How connected parts can move.
Design thinking: How to choose pieces for a specific function.
Spatial reasoning: How to arrange parts around a central body.
Fine motor skills: How to connect and adjust small building elements.
Make it easier: Build a stationary spider with eight legs and focus on symmetry.
Make it more challenging: Create a spider with synchronized leg movement or a rotating body section. Ask children to explain how changing one connection affects another part.
This activity encourages kids to look beyond how a creation appears and explore how it works. When a mechanism gets stuck or a leg falls off, they can experiment with new connections and build confidence through problem-solving.
Safety note: Use age-appropriate pieces and supervise younger children around small parts.
4. Build a Pumpkin-Inspired Vehicle That Rolls

The challenge: Can your child design a pumpkin-shaped vehicle that rolls from start to finish?
What happens when Halloween meets transportation engineering? Kids can transform a classic pumpkin into a rolling creation and explore how wheels, axles, and balance affect movement.
Suggested ages: 5–12 years
Estimated time: 25–35 minutes
Materials:
LEGO® bricks and plates
Compatible LEGO® wheels and axles
Orange bricks, if available
Small LEGO® figures or lightweight cargo
A smooth, flat surface or gentle ramp
A ruler or measuring tape, if available
Step-by-step directions
Design the pumpkin. Build an orange or pumpkin-inspired body using available bricks.
Create the base. Attach a stable platform underneath the pumpkin.
Add the wheels. Install compatible wheels and axles, making sure they can rotate freely.
Check the balance. Place the vehicle on a flat surface and see whether it sits evenly.
Run a rolling test. Give the vehicle a gentle push. Does it roll straight, turn, or tip over?
Improve the vehicle. Adjust the wheel placement or change the body's balance.
Try a second test. Compare how the modified vehicle performs.
What will kids learn?
Simple machines: How wheels and axles help objects move.
Physics: How balance and friction affect motion.
Engineering: How to design, test, and improve a working vehicle.
Early math: How to measure distance and compare results.
Make it easier: Build a simple rectangular vehicle with four wheels before adding pumpkin decorations.
Make it more challenging: Create a ramp challenge and compare how far different vehicles travel. Keep the ramp height and starting position consistent so the results are easier to compare.
A pumpkin vehicle needs to do more than look good. By testing how far it rolls and making adjustments, kids discover how creative design and practical problem-solving work together.
5. Design a Spooky Scene and Tell a Story

The challenge: Can your child build a spooky LEGO® scene that tells a story from beginning to end?
Not every STEM challenge needs to focus on making something stronger or faster. Storytelling combines building, planning, communication, and logical thinking.
Kids might create a haunted forest, a monster's secret laboratory, a ghost's Halloween party, or a neighborhood preparing for trick-or-treating.
Suggested ages: 4–12 years
Estimated time: 20–40 minutes
Materials:
LEGO® bricks and plates in different colors
LEGO® minifigures or homemade brick-built characters
Optional paper and pencils for planning
Optional Halloween decorations made from craft materials
Step-by-step directions
Choose a setting. Decide where the story takes place, such as a haunted castle, spooky forest, or mysterious pumpkin patch.
Create the main character. Build a ghost, witch, monster, or another character to lead the story.
Build the environment. Add paths, houses, trees, bridges, or secret rooms.
Introduce a problem. Perhaps a ghost cannot find its way home, a bridge is broken, or a monster has lost its Halloween candy.
Build a solution into the scene. Add a feature that helps solve the problem.
Tell the story. Explain what happens, who is involved, and how the characters overcome the challenge.
Share and collaborate. If building with siblings or friends, let each person contribute a character or scene.
What will kids learn?
Creative thinking: How to turn an idea into a three-dimensional creation.
Planning and sequencing: How events connect in a story.
Problem-solving: How characters can overcome challenges.
Communication: How to explain ideas and share a finished project.
Collaboration: How to combine different ideas into one creation.
Make it easier: Provide a simple story prompt, such as “A ghost wants to visit a pumpkin patch,” and let your child build one scene.
Make it more challenging: Create three connected scenes showing the beginning, middle, and end of a story. For a group challenge, have each builder create one part without revealing the whole story until the end.
Every child approaches a story differently. Encourage kids to explain their ideas, listen to their teammates, and find ways to connect their creations into one imaginative scene.
How Can I Make Halloween STEM Activities Educational?
The easiest way to make Halloween STEM activities educational is to give children a clear building challenge, ask them to predict what will happen, and let them test and improve their designs.
Instead of asking kids to copy a model exactly, use open-ended questions that encourage them to think like engineers.
Try these questions during any of the five activities:
Plan: What do you want your creation to do?
Predict: What do you think will happen when we test it?
Build: Which bricks or pieces might help you reach your goal?
Test: Did your creation work the way you expected?
Improve: What could you change to make it better?
Explain: What did you discover, and what would you try next?
These questions connect imaginative play with real learning and help parents and educators recognize the STEM concepts behind each project.
Tips for Getting the Most Out of Halloween LEGO® Activities
Want to make these Halloween building challenges even more rewarding? Keep these tips in mind.
Let children make their own choices. Give them a goal, but allow them to decide how to reach it. Different designs can solve the same problem.
Celebrate the process, not just the finished build. A collapsing bridge or a vehicle that turns the wrong way can be a valuable learning opportunity.
Introduce simple measurements. Count the bricks used, measure a bridge's length, or compare how far two vehicles travel.
Encourage teamwork. Invite children to work together, explain their ideas, and test each other's designs respectfully. Everyone should have a chance to contribute.
Match the challenge to the child's age and ability. Younger children may benefit from simpler goals and more support, while older children can explore more complex mechanisms, measurements, and design improvements.
Keep it playful. Children are often more willing to experiment when they are having fun and feel free to try something different.
Share Your Halloween LEGO® Creations!

We would love to see what your little builders create!
Did your child build a spooky haunted house, a creepy-crawly spider, or a pumpkin vehicle that actually rolls? Snap a photo of their Halloween LEGO® creation and share it with us on Facebook or Instagram.
Tag @campbrick in your post for a chance to be featured on our social media! We love celebrating the creativity, imagination, and hard work of young builders.
Let their creations inspire other families to build, experiment, and have some Halloween STEM fun of their own.
Bring More Hands-On Learning to Your Child with Camp Brick
Halloween is just one opportunity to turn curiosity into creativity. With hands-on building challenges, kids can explore engineering, practice problem-solving, develop teamwork skills, and discover the joy of learning by doing.
At Camp Brick, children build, experiment, collaborate, and bring their ideas to life through LEGO® STEM activities and enrichment programs. From creative building and robotics to exciting team challenges, our programs give children opportunities to explore their interests and learn through discovery.
Our goal is to give every child a space where they feel included, inspired, and proud of what they build.
Want to bring creative building and hands-on STEM learning to your child's school?
Explore our LEGO® clubs and enrichment programs to discover how Camp Brick can help your school community build, create, and learn together.
Visit CampBrick.com to learn more about our programs and bring more building adventures to your community!
LEGO® is a trademark of the LEGO® Group, which does not sponsor, authorize, or endorse this article. Camp Brick is not affiliated with or endorsed by the LEGO® Group.

Comments